
Expert Golf Insights
E-Tips
Practical lessons and proven techniques from PGA professionals to help you sharpen every part of your game — from full swing to short game.


Full Swing Efficiency Analysis
Breaking down the movement, mechanics, and setup for a balanced, powerful swing.
- Is the swing balanced from start to finish? Does the player hang back or fall off balance after impact?
- How’s the tempo? A typical tour swing lasts about 1.1 seconds from takeaway to impact.
- Does the player move athletically? Good swings show coordination, rhythm, and consistent contact.
- Are there flexibility limitations or excessive rotation of the shoulders and hips?
Club Performance at Impact
Efficient impact creates consistent, controlled ball flight. Key factors to evaluate:
Club Path
Ideal path is 0–4° inside-to-out. Straight down the line is best, slightly outside-to-in is acceptable.
Clubface Angle
The face should be square to path, within 0–3° variance.
Angle of Attack
Tour averages show a downward hit of 2.9° with a 3-wood, 4.1° with a 6-iron, and 5° with a pitching wedge.
Launch & Spin
Optimal driver launch is around 11° with 2600–2700 rpm spin. Higher launch with lower spin improves distance.
Centered Contact
Ball should strike the middle of the clubface. Contact toward the heel or toe suggests setup or lie-angle issues.
Clubhead Speed
Average male speed with a 6-iron is ~80 mph; PGA Tour average is 92 mph. Low or excessive speed usually signals inefficient shoulder or hip rotation.
Grip
The grip is your connection with the golf club.
Grip Types
Overlap, Interlock, or Ten-Finger (baseball).
- Ten-finger: ideal for juniors or weaker hands.
- Interlock: secure for smaller hands (used by Woods, Nicklaus).
- Overlap: most common among adult players.
Hold the club in your fingers, not palms.
The “3 P’s” of Grip
- Placement: Where hands connect (interlock, overlap, ten-finger).
- Positioning: Palms face each other; “V’s” of thumbs/index fingers point toward the right armpit.
- Pressure: Medium-light grip (around 3 out of 10).
Neutral vs. Strong vs. Weak
- Strong grip: Hands rotated right; promotes closed face and right-to-left ball flight.
- Weak grip: Hands rotated left; keeps face open longer and produces left-to-right flight.
- Neutral grip: Encourages consistent ball striking and less need for adjustment.
The grip is essential as it is the only part of your body that touches the golf club. Your hand positions on the golf club are considered neutral, strong or weak. Generally speaking we teach a neutral grip. Neutral hand positions on the club mean that when you place your left hand on the club (for right-handed players) the crease between your thumb and index finger point in the direction of your right armpit. Likewise, after placing your right hand on the club, the crease between your right thumb and right index finger should point toward your right armpit as well. The creases between the thumb and index fingers should point toward the left armpit for the left-handed golfer.
From this neutral grip position, the more right-handed players rotate their hands to the right on the golf club, the stronger the grip becomes. A strong grip generally promotes a closed clubface resulting in a right to left ball flight. Signs of a strong grip are a cupped left wrist at set up or a right hand that appears to be almost under the golf club at set up. A weak grip is the opposite of a strong grip. The more the hands rotate to the left on the club (for righties) the weaker the grip becomes. A weak grip will tend to keep the clubface open longer through the hitting zone resulting in a left-to-right ball flight. These comments are simply guidelines to follow. A strong grip does not equal a closed clubface or draw ball flight. With a strong grip the golfer must compensate somehow in order not to hit the ball left and vice versa the weak gripped player will compensate in order not to hit a slicing golf ball. This is precisely why we teach a neutral golf grip. The less compensating movements we require in our golf swing the more consistent our ball-striking will become.
Setup
Setup establishes every key position in the swing.
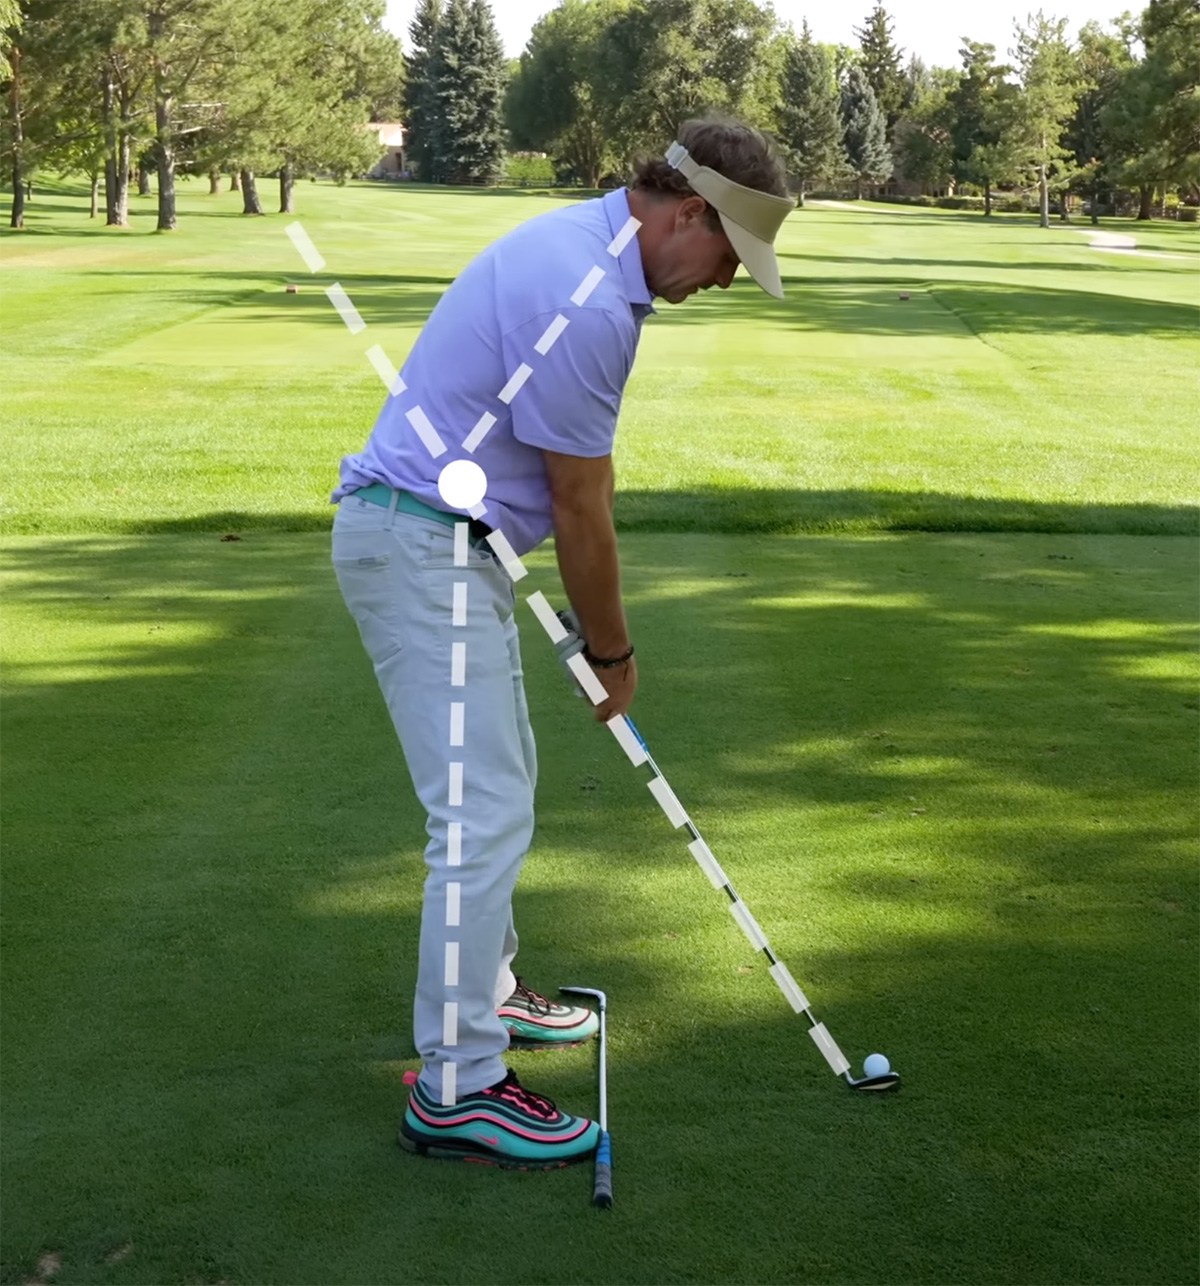
Sideview
- Slight knee flex, proud spine, hinge from hips
- Arms hang naturally with space between hands and thighs
- Hands aligned with toes, shaft through belt buckle
- Chin up
- Alignment Tip: Club along the heels should point parallel left of target line; right indicates closed stance, left indicates open.
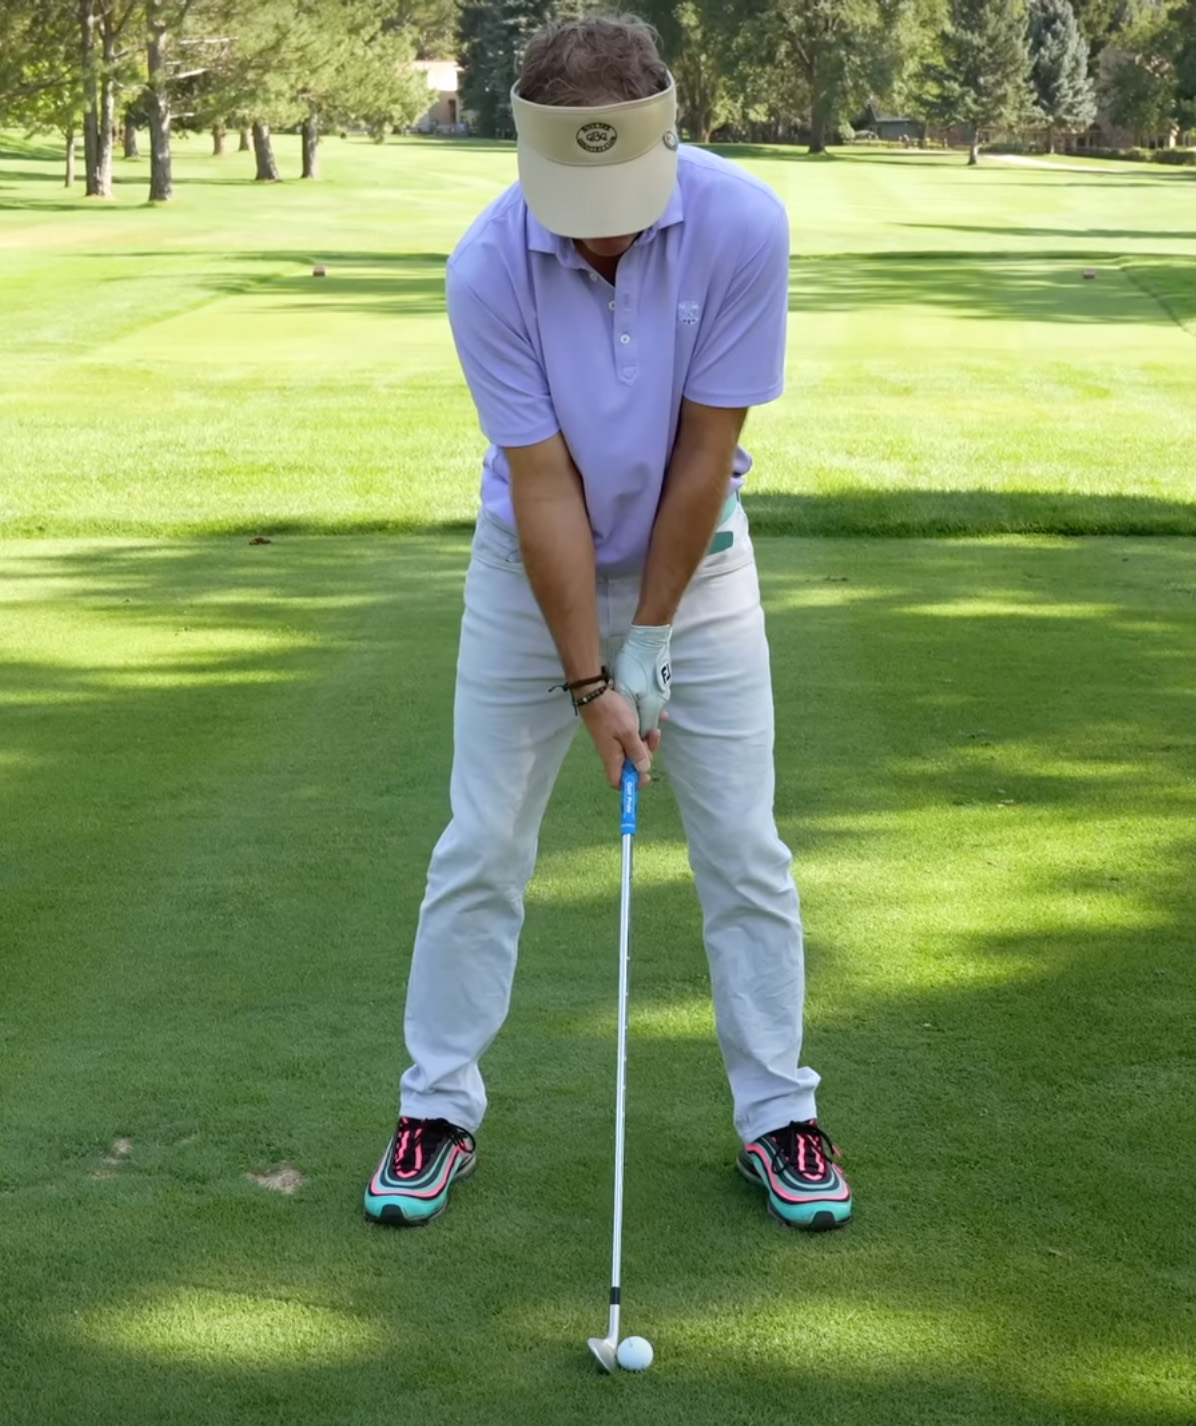
Frontview
- Feet shoulder-width apart
- Hips balanced
- Slight right spine tilt (for right-handers)
- Hands even or slightly ahead of the ball
Backswing
Efficient coil generates power and sets up proper downswing sequence.
Sideview
- Core and shoulders start together in a one-piece takeaway.
- Club remains on plane at hip height; arms stay in front of body.
- Shoulders rotate about 90°, hips ~45°.
- Right knee stays flexed, left knee moves slightly inward (~2″).
- Maintain original spine tilt—avoid “lifting” or leveling shoulders.
Frontview
- Torso and shoulders rotate over a stable lower body (creating the X-Factor).
- Hips remain within foot boundaries—avoid swaying.
- Weight shifts to inside of right foot; head moves slightly right.
- Proper coil builds tension for a strong downswing.
Downswing & Impact
The downswing reverses the coil — using ground force and sequencing from the ground up.
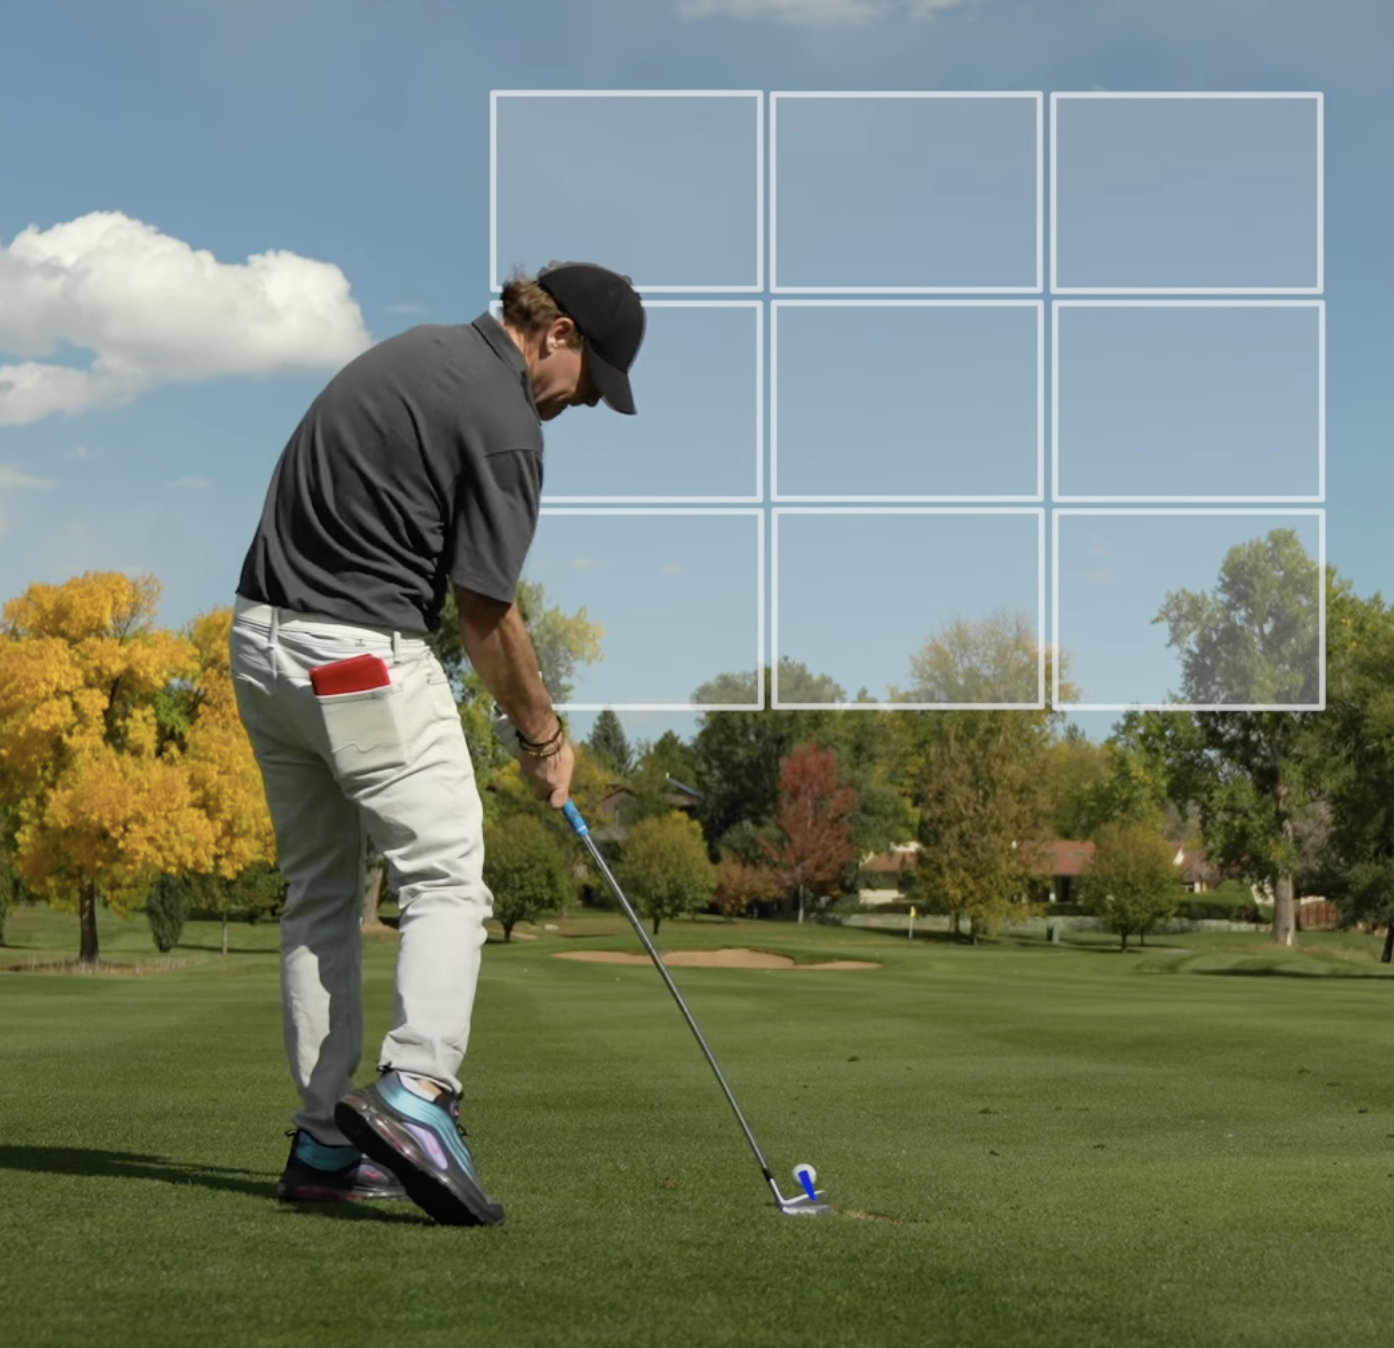
Sideview
- Right side obliques visible at impact (not lower back).
- Maintain wrist hinge — avoid early release or casting.
- Right heel begins to lift but remains grounded through impact.
- Arms stay in front of body, allowing clean release and balanced follow-through.
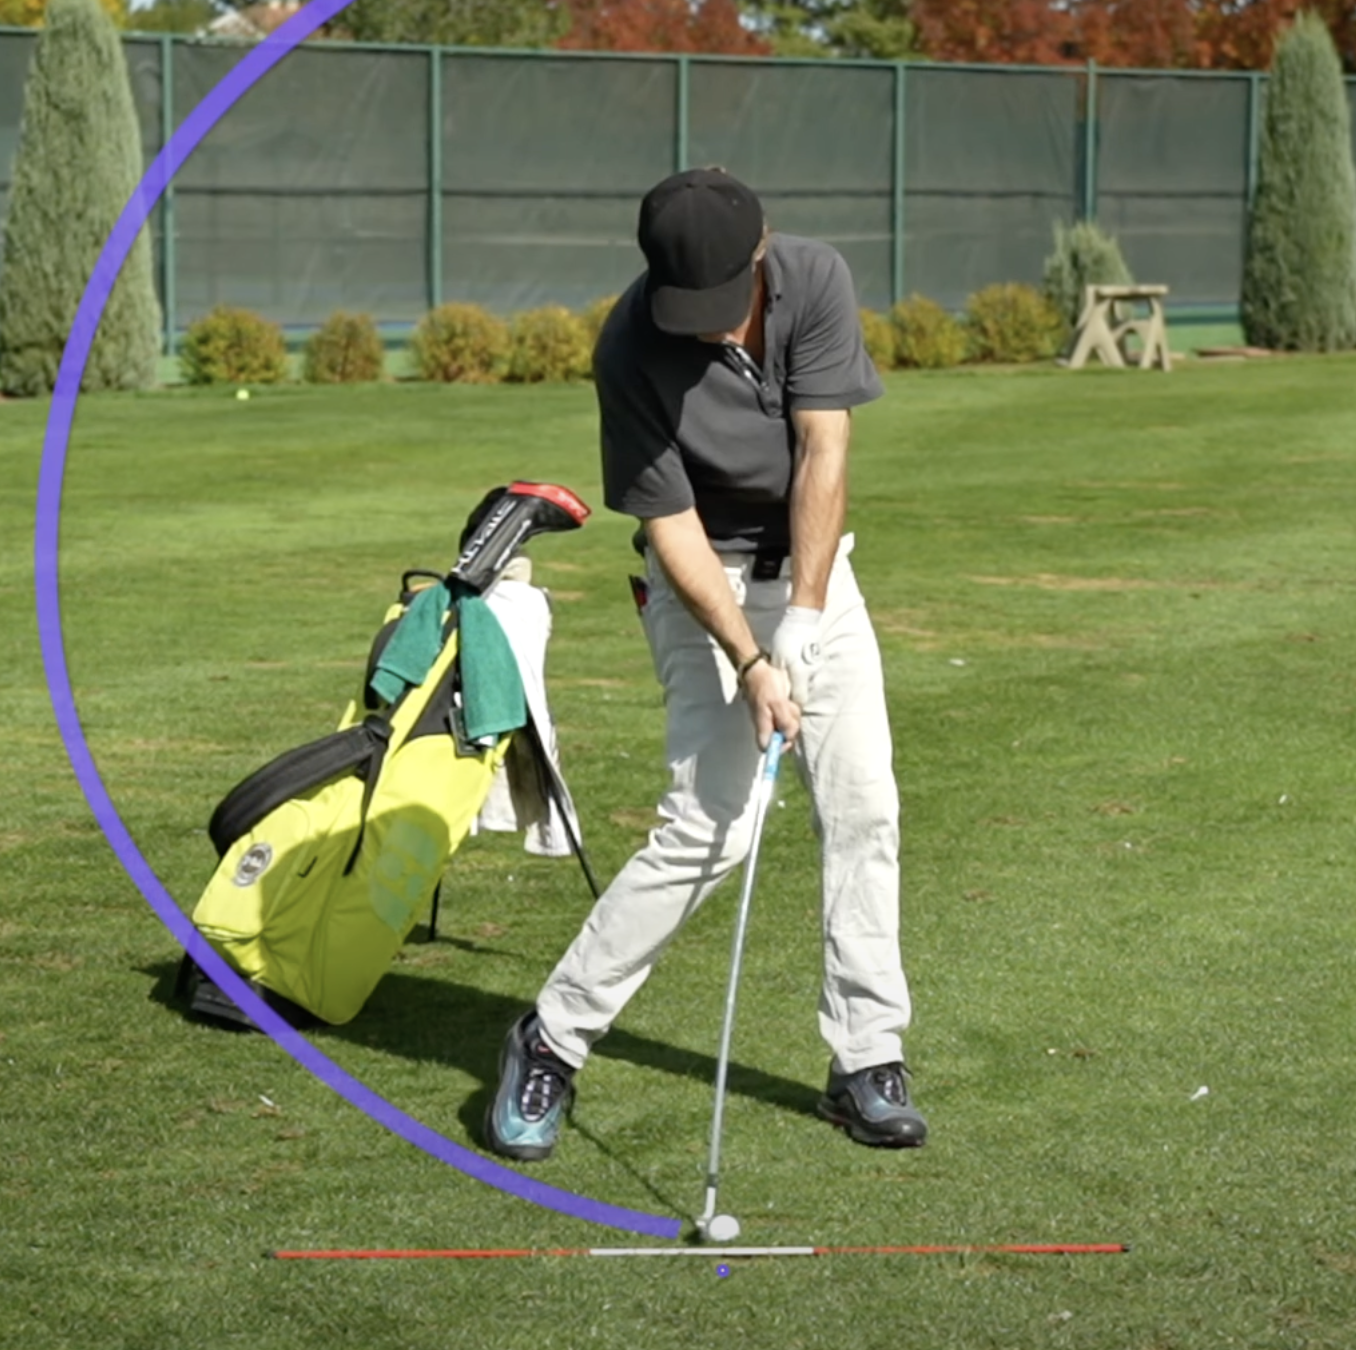
Frontview
- Lower body drives first, posting up on a straight left leg.
- Hands lead through impact with left arm extended.
- Head slightly behind ball; weight fully transferred to left side at finish.

Mastering the Putt
Build confidence, consistency, and distance control on the green. Use your putter whenever the ball is on the green, and often from the fringe or just off the green. The goal is simple: your worst putt is usually better than your worst chip.
A great putting stroke comes from simplicity, rhythm, and confidence. Master your setup, trust your stroke, and focus on distance control — the rest will follow.
Setup & Alignment
Ball Position
Slightly forward of center.
Grip
Reverse overlap is most common; left-hand-low is fine for comfort. Use an interlocking grip only on very long putts to add release and distance.
Weight
Even or slightly favoring the left side (for right-handers). Slightly pinch knees inward for stability.
Hand & Eye Position
Hands even with or slightly ahead of the ball. Eyes should be directly over or slightly inside the ball — check by dropping a ball from your eyes.
Posture
Hips centered over heels, arms hang naturally so the putter becomes an extension of the forearms. Most players use putters that are too long — check fit if your setup feels cramped.
Alignment
Feet, hips, and shoulders parallel to target line.
Technique & Stroke
The putting stroke is powered by the shoulders, back, and forearms — not the wrists.
Maintain the “triangle” formed by your shoulders and arms throughout.
Backswing and follow-through should be equal in length with a smooth, steady tempo.
Control distance by length of backswing, not speed.
Keep wrists quiet — stroke should be smooth and pendulum-like.
Shorter putts move almost straight back and through; longer putts follow a slight arc.
Forward swing should slightly slow after impact for a true roll instead of a bounce.
Strategy & Feel
Use the same tempo for every putt — only vary swing length for distance.
Choose a stroke style:
- Straight-back, straight-through (minimal face rotation)
- Arc stroke (face opens slightly on backswing, releases through impact)
Maintain a steady head and quiet lower body.
Keep light grip pressure for feel, with hands facing each other to prevent wrist hinge.
Use alignment aids or clubs on the ground to verify setup — most players unknowingly aim right of target.
Drills for Better Putting
Distance Control Drill
Putt from one end of the green to the other, stopping just short of the fringe. Focus on consistent distance, not direction.
Short Putt Drill
Practice from 2–4 feet — aim to make every putt. Build confidence by seeing the ball go in.
Gate Drill
Set two tees slightly wider than your putter face and strike the ball without touching them. Ensures center contact and straight roll.
Ladder Drill
Place tees every 5 feet up to 40 feet. Putt to each zone in order. If you miss or overshoot, start over. Develops precise distance control.
Clock Drill
Place four balls in a circle around the hole starting at 2 feet. Make all four, then move each ball one foot farther out. Miss one? Start again — builds focus and pressure tolerance.
String Line Drill (Favorite)
Stretch a string 6–8″ above the green from 2 feet behind the hole to 10 feet away. Use it as a guide for line, stroke path, and center contact.

Chipping Fundamentals
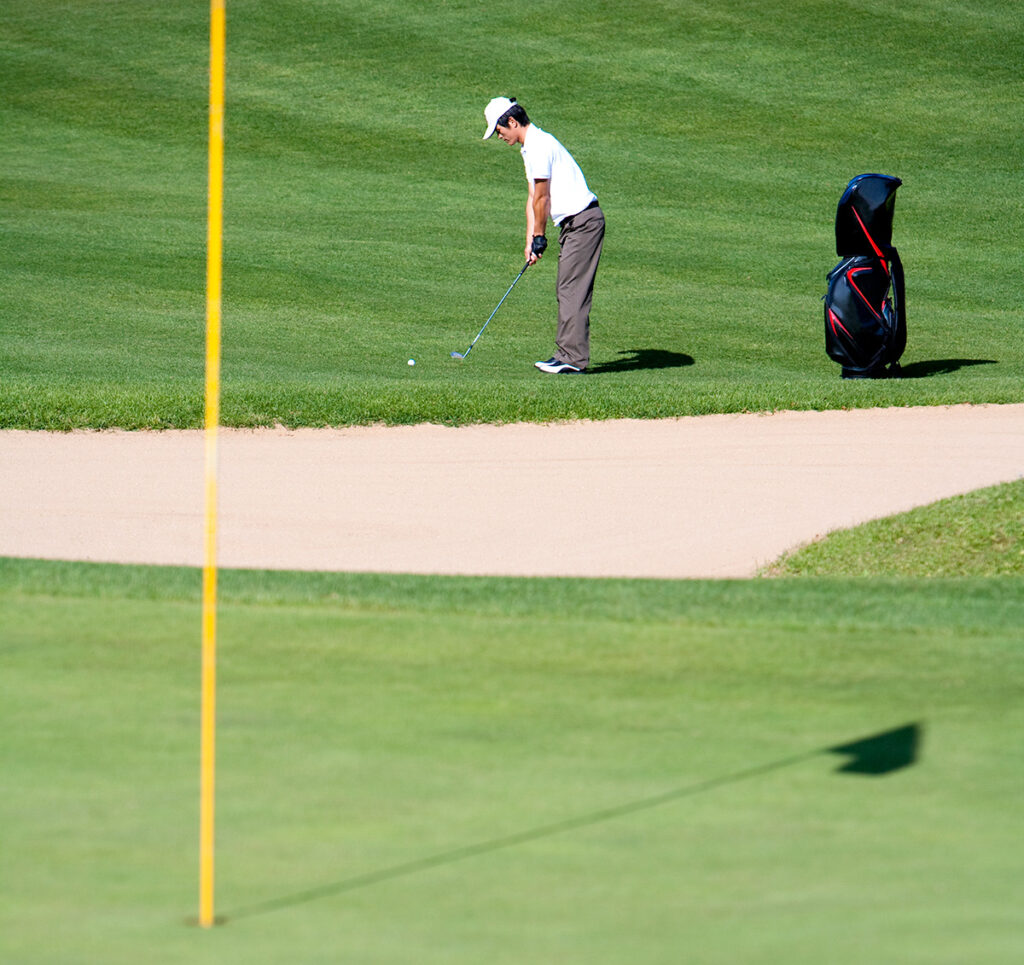
A chip shot is the go-to option when you’re too far from the hole to putt safely but don’t need the height or distance of a full pitch. It’s a low, controlled shot that spends minimal time in the air and maximizes roll along the green, mimicking the motion of a long putt. The goal is to land the ball just a few paces onto the green and let it release naturally toward the hole with predictable distance and pace.
Setup & Position
Stance
Narrow and slightly open (about 35–45°). Ball positioned near the right big toe for right-handers.
Weight
Firmly on the front foot with slight knee flex. Pinch knees together for added stability.
Hands
Press slightly forward (toward the left thigh) to create shaft lean and ensure a downward strike.
Head
Entirely in front of the ball.
Grip
Hold near the end of the grip for control and feel.
Posture
Hands “high” to prevent the club’s heel from digging into the turf.
Technique
The chipping stroke should feel like a small pendulum powered by your shoulders, back, and arms, not your hands or wrists
Pendulum Motion
Use a small, pendulum-like swing powered by your shoulders and arms, not your wrists. This keeps the club moving smoothly and ensures solid contact.
Quiet Wrists:
Keep your wrists firm and stable through impact. Avoid flipping or breaking the wrists to maintain a square clubface and consistent roll.
Balanced Swing
Your backswing and follow-through should be equal in length with a steady rhythm. Stay smooth and avoid rushing or decelerating.
Accelerate Through Impact
Swing through the ball, not at it. A gentle acceleration keeps the strike crisp and prevents chunked or scooped shots.
Forward Shaft Lean
Maintain your hands ahead of the clubhead through impact. This promotes a clean, downward strike and proper roll.
Downward Strike
Let the club’s loft lift the ball — don’t help it up. A slight downward motion ensures solid contact and a predictable trajectory.
Strategy & Feel
Club Selection & Roll Ratios
Use the same smooth swing for every club — let loft determine how far the ball rolls.
- Pitching Wedge: Flies and rolls about the same distance (1:1 ratio).
- 9 Iron: Rolls roughly twice as far as it flies (1:2).
- 8 Iron: Rolls about three times its carry (1:3).
- Sand Wedge: Rolls about half as far as it flies.
Understanding these roll ratios helps you visualize each shot and predict how the ball will react once it lands — a key to controlling distance and leaving yourself closer putts.
Execution & Consistency
Focus on a specific landing spot a few paces onto the green and repeat it consistently. Keep your motion simple and connected.
- Maintain a quiet lower body — avoid excess movement
- Use less forward press with lower-lofted clubs, slightly more with wedges
- Keep the backswing compact with a smooth, steady tempo
- Choose your club based on landing area and green speed, not by changing your swing.
- On uphill or downhill chips, adjust club selection instead of swing speed.
Drills for Better Chipping
Loft Variation Drill
Chip to the same target using a variety of clubs — from your 7-iron to sand wedge — and notice how each one rolls differently. This helps you understand carry-to-roll ratios and teaches you how to choose the right club for any lie or green speed.
Target Distance Drill
Pick a specific spot or hole and chip repeatedly until you can land the ball and roll it close every time. Focus on using the same tempo and rhythm with each swing to improve distance control and consistency.
Short-Range Challenge
From just off the green, chip with a pitching or sand wedge until you hole two balls in a row. Aim to make every shot — the mindset of trying to hole out each chip builds confidence, touch, and focus under pressure.
Pitching Fundamentals
A pitch shot bridges the gap between a chip and a full swing. It’s ideal when you’re too far to chip safely yet too close for a full shot. Pitch shots launch higher, carry farther, and have more airtime than roll time, making them perfect for soft landings or when you need to clear rough, slopes, or bunkers near the green.
Setup & Position
Ball Position
For a stock pitch, position the ball in the center of your stance. To fly it lower, move it slightly back; to hit it higher, move it slightly forward.
Stance Width
A stance just narrower than shoulder-width works well, but adjust based on comfort and the shot type.
Weight Distribution
Stay evenly balanced or slightly favor your front foot (left side for right-handers) depending on the trajectory you want.
Hand Position
For lower shots, keep your hands ahead of the ball; for higher ones, set them even with or slightly behind it.
Alignment
Feet, hips, and shoulders should be nearly parallel to the target line.
Grip
Choke down on the club slightly for added control and feel on shorter pitches.
Technique
Leading Edge Pitch
Used for lower shots that hop once or twice and stop quickly. Play the ball back in your stance and strike down with the leading edge, letting the ball check up after the first bounce.
Mid-Sole Pitch (Stock Shot)
Your go-to pitch for most situations. Play the ball near the middle of your stance and let gravity guide a smooth swing. The club should brush the turf with the middle of the sole, creating a controlled, medium-height flight.
Trailing Edge Pitch (Flop Shot)
For high, soft landings, move the ball forward and allow the hands to set slightly behind the ball. Swing freely with relaxed wrists so the trailing edge contacts the turf first. Best played from fluffy or soft lies — avoid tight or firm ground.
Swing Path Options
- Straight Back & Through: Minimal face rotation; ideal for stock shots.
- Inside-to-Out Path: Slight draw spin and extra roll; close stance slightly.
- Outside-to-In Path: Higher trajectory with more spin; open stance slightly.
Backswing & Tempo
Limit the backswing to left arm parallel for a stock pitch — around 50 yards with a 56° wedge. Keep the tempo smooth and even, matching backswing and follow-through length (toe-up to toe-up).
Strategy & Feel
Distance & Trajectory Control
Use the same swing tempo for every pitch. Vary the length of your swing to adjust distance, and fine-tune trajectory with wrist hinge and club selection.
- More wrist hinge = higher flight, softer landing
- Less wrist hinge = lower flight, more roll
- Different wedges offer unique flight-to-roll patterns — experiment to find your go-to yardages
Body Rotation & Practice
Let your body rotation — not your hands — provide momentum. Avoid flipping the wrists through impact; instead, turn your hips and torso smoothly toward the target.
- Keep your tempo consistent and your follow-through balanced
- Use body motion, not extra force, to generate distance
- Practice from a slight downhill lie to develop crisp contact and improve your pitching quickly

Bunker Play
There are three main types of bunker shots you’ll encounter:
- Greenside Bunker
- Greenside Bunker (Buried)
- Fairway Bunker
The goal is simple — get the ball out of the bunker in one shot and onto the green. Proximity to the hole depends on your skill level, but success starts with clean, confident contact.
Setup & Position
Greenside Bunker
- Ball Position: Forward of center. Dig your feet into the sand for stability and extra knee flex.
- Weight: Slightly favor your front foot (left side for right-handers) with the ball positioned off your sternum.
- Clubface: Open the face so it points toward the sky before gripping. This exposes the bounce of the wedge, helping the club glide through the sand.
- Grip: Use a slightly weaker (open) grip to keep the face open through impact.
- Alignment: Feet, hips, and shoulders aligned left of target; swing along your body line so the open clubface sends the ball toward the target.
- Hand Position: Even to slightly behind the ball; grip down slightly for added control.
Greenside Bunker (Buried Lie)
- Ball Position: Center or slightly forward.
- Clubface: Adjust face angle for desired result — slightly closed for a lower, running shot or open for a high, soft one.
- Weight: About 70% on the front foot.
- Grip & Setup: Dig feet in, lower hands, and align square to target line.
- Swing: Lift the club steeply and chop down into the sand.
- For a lower, hot shot, hit closer to the ball.
- For a high, soft shot, hit deeper behind it with a shorter follow-through.
Your only goal here is to get the ball out and onto the green.
Fairway Bunker
- Ball Position: Slightly back of center (one or two ball widths).
- Feet & Grip: Dig in lightly for balance and grip down to offset lowered stance.
- Focus: Keep head and lower body still for clean contact.
- Contact: Hit the ball first, not the sand.
- Club Choice: Consider one extra club and prioritize solid contact over power.
Technique
Upright Swing Motion
Arms move up and down more than around the body, with minimal hip turn. This steeper motion helps the club enter the sand cleanly behind the ball.
Splash the Sand
Let the club drop into the sand behind the ball — you’re moving sand, not the ball itself. The impact should sound like a thump, not a dig.
Smooth Tempo
Maintain a steady, fluid rhythm. The backswing is often longer than the follow-through; the length of your forward swing controls distance.
Add Height & Spin
After striking the sand, allow the lead wrist to cup slightly, returning the clubface toward your body. This creates more spin and loft, producing a higher, softer shot.
Sound Feedback
Listen for a clean, consistent thump. Good bunker players rely on sound and feel as much as sight to perfect their contact.
Strategy & Feel
Control & Consistency
- Focus on moving sand, not the ball.
- Visualize the exact spot behind the ball where the club should enter.
- Keep tempo identical on every swing.
- Adjust for slopes: uphill lies launch higher, downhill lies fly lower.
- Match your shoulders to the slope for clean entry.
- Practice hitting the same entry point repeatedly for consistency.
Confidence & Practice
- Use the Peak Drill: pick a small mound of sand and practice shaving just the top off to learn precise entry.
- To hit farther, take less sand or slightly extend the forward swing.
- Don’t force extra distance with your hands — let the club’s momentum do the work.
- Believe in your technique. Confidence is key in bunker play — trust the motion and commit to every shot.